Wednesday, October 07, 2009

SharePoint Conference 2009!

Ok so, I am cautiously excited about SharePoint 2010 and definitely looking forward for the announcements at the SharePoint Conference 2009.  


Two of the new SharePoint 2010 features which caught my eye right away were:


1) Business Connectivity Services

This is Business Data Catalog the way it should have been with version 1. BCS now supports CRUD operations, yes, you heard it right. No more relying on 3rd party tools and worry about scalability of business apps with newer versions of SharePoint (Ok, I made that sound too easy!)

So new BCS features as per this post seems like:

  • Read and Write capability
  • Integrated Editor Environment into SharePoint Designer 2010 and Visual Studio 2010
  • Integrated into Office 2010 Suite


2) Client Object Model API

Just as it sounds, this is a client side API for interacting with data on the SharePoint server using JavaScript, .NET code, or Silverlight.


Still not excited?

Then how about this one?

SharePoint Server 2010 won’t support Internet Explorer 6 J


I’ll post the conference updates/announcement via twitter . See you all at the SharePoint Conference 2009!Print


*  Disclosure: Details in this post aren’t from any of the NDA materials or the actual software. You can find this info in the SharePoint 2010 sneak peak  

Wednesday, August 05, 2009

How to Chain TFS Builds?


One of my colleagues @gdurzi recently asked me this question. Sounds straightforward enough to be supported out of the box with TFS right? Too many quirks with this. And I recommended using the ever faithful MSBuild <Exec> task to make a call to TFSBuild.exe to queue a new build from the first TFSBuild.proj with something like this

TFSBuild.exe start /queue %TFSSVR% %TEAMPROJECT% %BUILDTYPE%

An issue with using TFSBuild.exe is that you cannot pass Build agents as a command line argument which was a deal breaker for us.

There are several approaches that you can take based on your particular scenario so let’s define the scenario here, you have a Main_Build TFS build definition that builds your core project and you want the ability to have multiple staging builds running the same Main_Build for compilation/building, but be custom staged for deployment based on who calls Main_Build. Very useful when you have a product which rolls out to multiple clients with a need for custom pre-build and post-build actions per client.  So here is one way to do Build Chaining with TFS 2008.

Step 1: Let’s create a custom MSBuild task using the Team Foundation object model which queues a build using the default build agent associated with the Build definition file.

Sample code for Queuing: QueueTFS.cs

using Microsoft.TeamFoundation.Client;

using Microsoft.TeamFoundation.Build.Client;


// Get the team foundation server.

TeamFoundationServer _tfsServer = TeamFoundationServerFactory.GetServer(_tfs);


// Get the IBuildServer

IBuildServer buildServer = (IBuildServer)_tfsServer.GetService(typeof(IBuildServer));


// Get the build definition for which a build is to be queued.

IBuildDefinition definition = buildServer.GetBuildDefinition(teamProject, buildDefinition);


// Create a build request for the build definition.

IBuildRequest request = definition.CreateBuildRequest();


request.CommandLineArguments = "Pass any custom command line args here"; // Ex: Custom Targets file

// Queue the build.

buildServer.QueueBuild(request, QueueOptions.None);


Step 2: Now copy the QueueTFS.dll to a new folder in TFS where you want to create the staging Build definition file. Now let’s create a minimal TFSBuild.proj file which uses our new MSBuild task and overrides the EndToEndIteration target. This will be our Staging build definition which will trigger the Main_Build build. Note that you will have to create this TFSBuild.proj by hand and simply point the project file location from the Build definition UI to the new folder.

Sample code for a minimal TFSBuild.proj:

<?xml version="1.0" encoding="utf-8"?>

<Project xmlns="http://schemas.microsoft.com/developer/msbuild/2003" ToolsVersion="3.5">

<Import Project="$(MSBuildExtensionsPath)\Microsoft\VisualStudio\TeamBuild\Microsoft.TeamFoundation.Build.targets" />


  <UsingTask TaskName="MyNewCustomTFSTask" AssemblyFile="QueueTFS.dll"/>


  <Target Name="EndToEndIteration">

    <Message Text="About to trigger main build" Importance="high"/>

    < MyNewCustomTFSTask TFS="http://TFSServer.com:8080/" TeamProject="TeamProject" BuildDefinition="Main_Build" TargetsFile="Custom.Target" XYZ="XYZ" />

    <!-- When everything is done, change the status of the task to "Succeeded" -->

    <SetBuildProperties TeamFoundationServerUrl="$(TeamFoundationServerUrl)" BuildUri="$(BuildUri)" TestStatus="Succeeded" CompilationStatus="Succeeded"/>


  </Target>

</Project>


Step 3: Edit your Main_Build TFSBuild.proj file with the pre-build and post-build target calls.


  <Target Name="BeforeCompile">


    <CallTarget Targets="Custom_PreBuild"/>


  </Target>


  <Target Name="AfterDropBuild" Condition="'$(BuildBreak)'!='true'">


    <CallTarget Targets="Custom_PostBuild"/>


  </Target>


We wanted the ability to run Main_Build by itself as well, to support this we add conditional imports in our Main_Build TFSBuild.proj to import a default targets file with empty Custom_PreBuild and Custom_PostBuild targets. $(CustomTarget) is what you would pass as a command line argument in Step 1 for request.CommandLineArguments

  <Import Project="$(CustomTarget)" Condition="'$(CustomTarget)'!=''"/>

  <!--Import CustomContoso.Target if no partner is passed in-->

  <Import Project="EmptyCustom.Target" Condition="'$(CustomTarget)'==''"/>


Step 4: Now create your targets file Custom.Target and EmptyCustom.Target with Custom_PreBuild and Custom_PostBuild targets and you are done.


I added support for updating build steps and a few other minor things which outside the scope of this blog post, but this should hopefully get you started.


Friday, June 19, 2009

Platform Agnostic apps failing on a 64 bit machine.


Ran into this issue yesterday, thought I will post it out here for anyone who runs into the same issue, since this is a very common issue with open source projects.

After wiring up the bits from CruiseControl.Net 1.4.4 SP1 with TFS on a machine running 64 bit OS, I was getting strange exceptions like

“Could not load file or assembly 'Microsoft.TeamFoundation.VersionControl.Client, Version=9.0.0.0, Culture=neutral, PublicKeyToken=b03f5f7f11d50a3a' or one of its dependencies…..”

The DLL in question seemed to be present in the GAC. So what really went wrong?

Windows Loader is responsible for deciding how to load and execute a program and the way it does that is by looking at the PE header on the app. This PE Header bit is set when the Platform Target in the build configuration of Visual Studio is set to one of the following:

  • x64: 64-bit—denotes that the developer has built the assembly specifically targeting a 64-bit process.
  • x86: 32-bit—denotes that the developer has built the assembly specifically targeting a 32-bit process.
  • Any CPU: Agnostic—denotes that the developer built the assembly that can run in either 64-bit or 32-bit mode.

When .Net apps are compiled with the default “Any CPU” your program will run as a 32 bit process on a 32 bit machine or as a 64 bit process on a 64 bit machine. The Windows Loader sees such DLLs as Agnostic DLL’s.

Simply marking the Platform Target as “Any CPU” does not guarantee that it will run on both 32-bit and 64-bit Windows.

Reason:  It is not possible to inject a 32-bit DLL into a 64-bit process, so be careful if your program has dependencies on native 32 bit DLLs or is making native calls assuming 32-bit. Exactly what was happening in my case.

Now how can you troubleshoot this issue when you don’t have the source code for an assembly? I use Dumpbin to evaluate this, open up your VS2005/2008 command prompt and run the following command

dumpbin Program.exe /headers

How can you fix such apps to working correctly on a 64 bit machine? Applications and assemblies marked/compiled as a 32 bit can run on 64-bit Windows with WOW64 emulator, so the PE header can be modified to be run as 32 bit


Run the CoreFlags Conversion utility from the VS2005/2008 command prompt


CorFlags.exe Program.exe /32BIT+ 

This should flip the PE header bit to mark the app/assembly as a 32 bit,  this does not affect the build of the assembly in anyway since this just conveys how the JIT compiler should interpret the assembly.


You can turn the bit back on with a


CorFlags.exe Program.exe /32BIT-

So in my case to fix the CruiseControl issue, I just ran the following:


CorFlags.exe CCService.exe /32BIT+ 

CorFlags.exe CCNet.exe /32BIT+ 

Thursday, October 23, 2008

MSBuild ItemGroup element issue

So you just moved from NAnt to MSBuild and put together the following MSBuild script to copy files (just like in my case)

<Project xmlns="http://schemas.microsoft.com/developer/msbuild/2003">
<
PropertyGroup>
<
Configuration Condition=" '$(Configuration)' == '' ">Debug</Configuration>
<
WSPDir>.\release</WSPDir>
</
PropertyGroup>
<
ItemGroup>
<
CompiledBinaries Include=".\bin\debug\*.dll" />
<
ProjectReferences Include="$(WSPDir)\**\*.*proj"/>
</
ItemGroup>

<
Target Name="Build">
<
MSBuild Projects="@(ProjectReferences)" Targets="Build"
        Properties="Configuration=$(Configuration)">
<
Output TaskParameter="TargetOutputs" ItemName="AssembliesBuiltByChildProjects"/>
</
MSBuild>
</
Target>
<
Target Name="Release" DependsOnTargets="Build">
<
Copy SourceFiles="@(CompiledBinaries)"
DestinationFolder="$(WSPDir)"/>
</
Target>
</
Project>
 
So I have an Item defined to generate a file list from the Bin\Debug folder
 <CompiledBinaries Include=".\bin\debug\*.dll" />

And then use the Copy command to copy the dlls
 <Copy SourceFiles="@(CompiledBinaries)"
DestinationFolder="$(WSPDir)"/>

But you will find that no dlls were copied from the bin folder, reason being that 
@(CompiledBinaries) is empty. This is because the content for the CompiledBinaries item 
is generated before running the actual targets.


The trick is to move the item creation into a Target by using a CreateItem task. So the following will create an item on the fly when the Target is executed.

<CreateItem Include="$(WSPDir)bin\**\*.*" >
<
Output TaskParameter="Include" ItemName="CompiledBinaries"/>
</
CreateItem>


So here is how the final working script will look like:


<
Projectxmlns="http://schemas.microsoft.com/developer/msbuild/2003">
    <
PropertyGroup>
        <
ConfigurationCondition=" '$(Configuration)' == '' ">Debug</Configuration>
        <
WSPDir>.\release</WSPDir>
    </
PropertyGroup>
    <
ItemGroup>
        <
ProjectReferences Include="$(WSPDir)\**\*.*proj"/>
    </
ItemGroup>

    <
Target Name="Build">
        <
MSBuild Projects="@(ProjectReferences)" Targets="Build" Properties="Configuration=$(Configuration)">
            <
Output    TaskParameter="TargetOutputs" ItemName="AssembliesBuiltByChildProjects"/>
        </
MSBuild>
    </
Target>
    <
Target Name="Release" DependsOnTargets="Build">
        <
CreateItem Include="$(WSPDir)bin\**\*.dll" >
            <
Output TaskParameter="Include" ItemName="CompiledBinaries"/>
        </
CreateItem>
        <
Copy SourceFiles="@(CompiledBinaries)"
       DestinationFolder="$(WSPDir)"/>
    </
Target>
</
Project>

Tuesday, August 19, 2008

Sharepoint Debugging with WSS V3

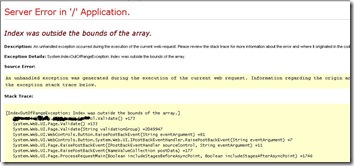
SharePoint debugging experience in WSS V3 can get annoying, when exceptions start looking like this generic message "An unexpected error has occurred"

DebugTrace

To enable stack trace similar to the ASP.NET error page, edit your web.config at C:\Inetpub\wwwroot\wss\VirtualDirectories and edit the following entries as follows:

<SafeMode CallStack="true"> <!--default is false -->
<
customErrors mode="Off" /> <!--default is true -->


and there you are...go fix it now! ;)


NiceStackTrace

Saturday, May 31, 2008

RIApalooza


RIApalooza was a Chicago based event focused on exploring the development of Rich Internet Applications which was held at the Illinois Technology Association between May 30-31, 2008.


RIA in the recent history has changed the IT industry’s outlook greatly from a designer’s role from just being a step in the lifecycle of the project instead leaning towards an iterative design based development paradigm. This is something we at Clarity Consulting recognized during some of our past design focused projects and been quite successful with adopting such a model.

I know what you are thinking...Yes, if you are looking for a job…go here else continue reading…<g>


Getting back to RIApalooza, it turned out to be a well attended event...RIApalooza as marketed wasn’t quite as platform agnostic as I expected, there were too many demo’s based on Adobe’s Flex…Maybe I went in expecting to see a good mix of different implementation models.


Geoff Cubitt of Roundarch did a good session “How RIA Changes In Application Design” showcasing some Flex and Ajax based RIA’s and talked about the considerations to keep in mind when moving desktop applications to an RIA.


Josh Holmes who is a RIA Architect Evangelist with Microsoft and Michael Labriola of Digital Primates a Chicago-based Adobe Solution Partner came together for a “Best and Worst Practices Building a RIA” session which was a good Design 101 class for starters *cough* Developers.


Open Mic session went pretty well with some good questions from the crowd…Overall an event worth getting up on a Saturday morning for!

Monday, March 31, 2008

Disk Cost Issue with ReserveCost!


This was an interestingly annoying issue I came across with Windows Installer, when you use the ReserveCost Element to specify the disk space by populating the disk cost for your components in the ReserveCost Table.

Here is the scenario:

1) You have a ReserveCost Element for your component which specifies the amount of disk space needed for the component.

2) You have conditions around the components which decide if the component is installed on the target machine.


So something like this….

<Component Id="MyCustomComponent" Guid="A2DCFC09-0651-4E2C-04A4-B18F759F9F41">
<
Condition>
<![CDATA[
MYCONDITION = "1"]]>
</
Condition>
<
File Id="MYCAB.CAB" Name="MYCAB.CAB" Source="$(var.CustomPath)MYCAB.CAB" Compressed="no"
  KeyPath="yes" DiskId="1" />
<
ReserveCost Directory="CABDIR" RunLocal="300000" RunFromSource="0" Id="CABID" />
</
Component>
 
3) And then you have checks as follows in the “Next” or “Install” button
to prevent the installation from continuing if the target machine does not have
sufficient space


<Publish Event="SpawnDialog" Value="OutOfDiskDlg"><![CDATA[(OutOfDiskSpace = 1 AND 
OutOfNoRbDiskSpace = 1) OR (OutOfDiskSpace = 1 AND PROMPTROLLBACKCOST="F")]]></Publish>
 

You would expect to see the assigned space of 300000, in this case in the Space requirements information section by subscribing to the “SelectionSize” event

<Subscribe Event="SelectionSize" Attribute="Text" />

And also expect that the installer will not proceed with the installation on the target machine with insufficient space and will trigger the “OutOfDiskDlg” dialog which you just wired up.


But unfortunately even though your ReserveCost table was populated correctly, Windows Installer decides to go the safe route of not including the size (ReserveCost size) of any components which have a condition around them and the total space needed for the component(and Product) is not correct anymore (even if the conditions which they are dependant on have already being determined to be true and the component will be installed).


The fix for this would be to include a dummy component with the ReserveCost element with no conditions under the same feature (and ofcourse with no File attribute).